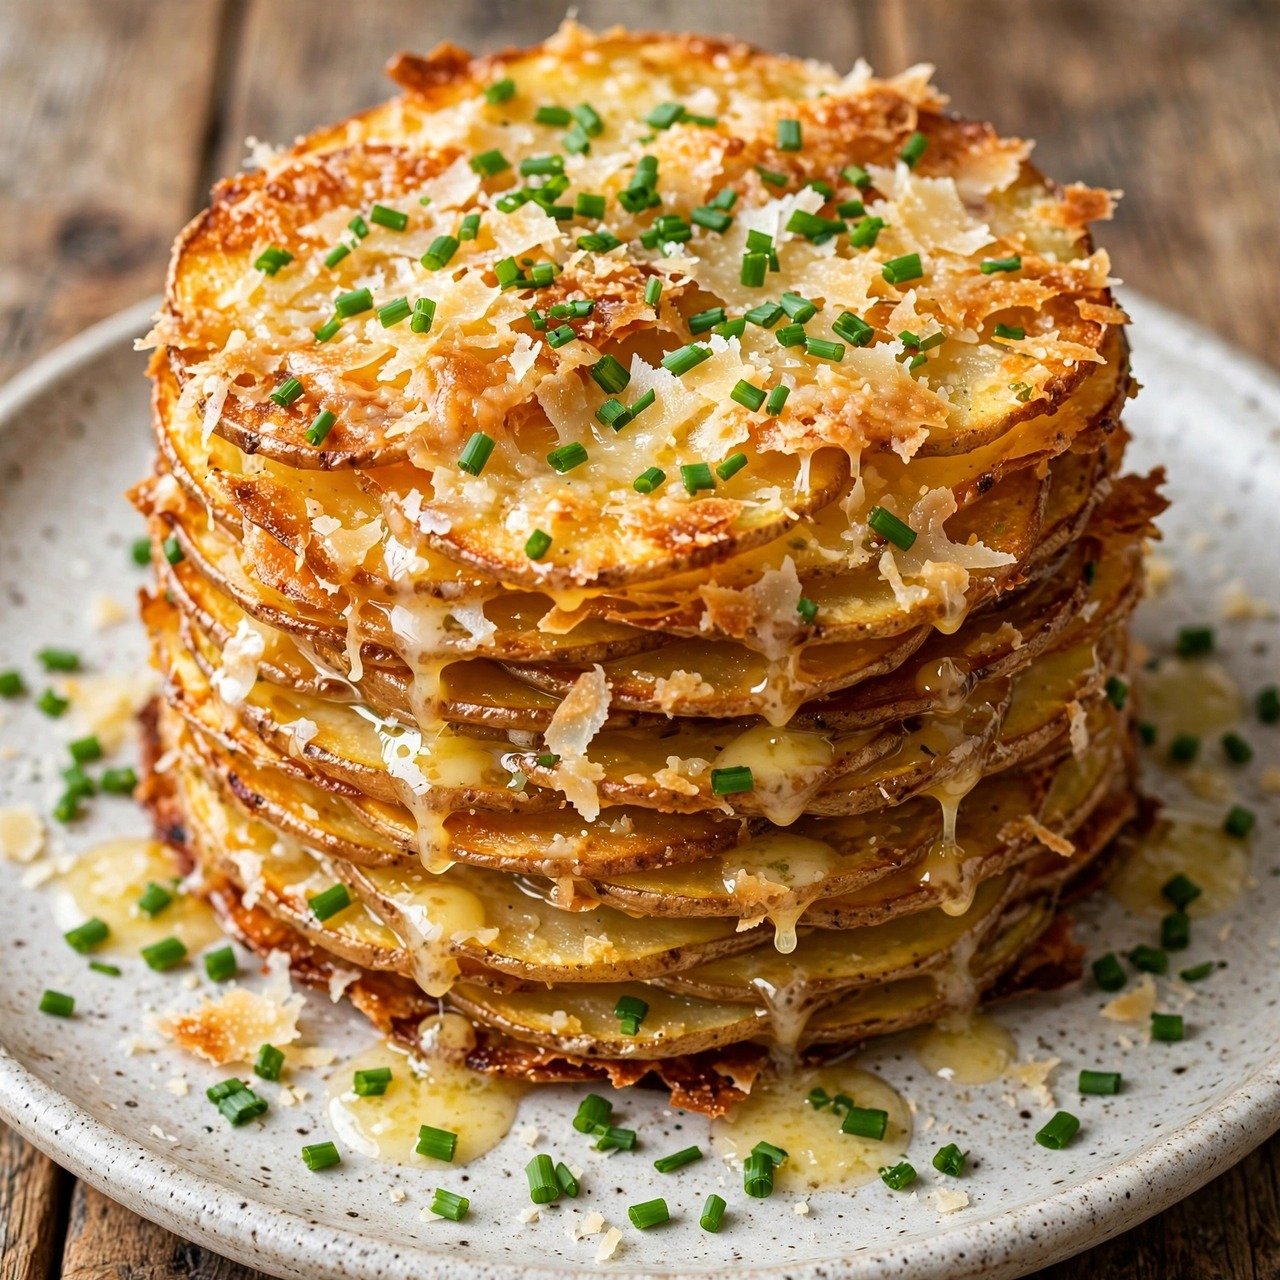
Crispy layered potatoes are the side dish that broke TikTok this month: thin slices of potato stacked into a tall, golden tower, baked until the edges shatter like chips while the center stays creamy. They look like something from a restaurant, but they are just potatoes, butter, and patience. Below is one base method plus five variations, all built on the same simple technique of slicing thin, stacking tight, and baking hot.
Why You’ll Love These Crispy Layered Potatoes
The magic of this dish is the contrast. Each slice is brushed with butter and stacked vertically, so the top edges crisp and brown like potato chips while the layers underneath steam each other soft. The result is a side dish that is crunchy and creamy in the same bite, which is exactly why it has racked up millions of saves.
The technique is forgiving in a way most fancy potato dishes are not. Because the potatoes are stacked in a loaf pan, they support each other, so there is no fussy layering in a round dish and no risk of the stack collapsing. A quick parboil is not needed; the potatoes cook through in the pan as long as the slices are thin enough. And the dish holds beautifully at the table, which matters on Thanksgiving when everything lands at once and the potatoes need to wait their turn.
Ingredients You’ll Need
This list makes one 9 by 5 inch loaf, serving 6 to 8 people as a side dish.
- 3 pounds Yukon Gold potatoes, peeled
- 6 tablespoons unsalted butter, melted
- 3 cloves garlic, finely grated
- 1 teaspoon fine sea salt
- 1/2 teaspoon black pepper
- 1/2 teaspoon smoked paprika
- 1/2 cup finely grated Parmesan cheese
- 2 tablespoons chopped fresh chives, for serving
- Flaky sea salt, for finishing
How to Make Crispy Layered Potatoes
Step 1: Slice the potatoes thin. Using a mandoline set to 1/8 inch, slice the potatoes into even rounds. Uniform thickness is the whole game: thick slices stay raw in the middle, thin slices burn. Place the slices in a large bowl of cold water as you work so they do not brown.
Step 2: Season and butter. Heat the oven to 375°F and butter a 9 by 5 inch loaf pan generously. Drain the potatoes and pat them very dry with clean towels; water on the surface steams instead of crisps. In a large bowl, toss the slices with the melted butter, garlic, salt, pepper, and smoked paprika until every slice is coated.
Step 3: Stack the slices. Stand the potato slices upright in the loaf pan, packed tightly in rows like a deck of cards. The tighter the pack, the taller and more dramatic the stack, and the better the layers hold together when you slice it. Sprinkle the Parmesan over the top so it melts into the crevices and forms a savory crust.
Step 4: Bake covered, then uncovered. Cover the pan tightly with foil and bake for 45 minutes. The covered phase steams the potatoes through so the center is tender. Then remove the foil, raise the oven to 425°F, and bake for 25 to 30 minutes more, until the top edges are deep golden brown and crisp. A knife should slide into the center with no resistance.
Step 5: Rest and slice. Let the stack rest in the pan for 10 minutes. This is not optional: the starches set as it cools slightly, which is what lets you lift out clean slices. Run a thin knife around the edges, invert the loaf onto a cutting board, and slice crosswise into thick pieces. Sprinkle with chives and flaky sea salt and serve immediately while the edges are still crackling.
Tips for the Best Crispy Layered Potatoes Every Time
Choose Yukon Golds over Russets. Yukon Golds have a naturally buttery flavor and a waxy texture that holds its shape in thin slices, while Russets fall apart and turn mealy. If you only have Russets, reduce the covered bake time by 10 minutes so they do not overcook.
Dry the slices thoroughly. This is the single most common mistake. Wet potatoes steam in the oven and never crisp. After draining, spread the slices on towels and press a second towel on top. It takes two minutes and it is the difference between golden edges and pale, soggy ones.
Do not skimp on the butter between the layers. The butter is what fries the edges as the stack bakes, so every slice needs a coating. If the butter starts to solidify while you toss, warm it for 15 seconds in the microwave and keep going.
Slice with a serrated knife. A straight blade can drag and tear the layers apart, while a serrated edge saws through the crisp top cleanly. Cut slowly and let the knife do the work.
Easy Variations
Classic Garlic Parmesan: The base recipe as written. Garlic, butter, and Parmesan are the cleanest version, and they let the potato flavor shine. This is the one to make first.
Cheesy Gruyère and Thyme: Swap the Parmesan for 3/4 cup of grated Gruyère and add 1 tablespoon of fresh thyme leaves to the butter. The Gruyère melts into a nutty, gooey layer between the slices and the thyme adds a woodsy, holiday note.
Smoky Bacon and Cheddar: Layer 1/2 cup of cooked, crumbled bacon and 1/2 cup of shredded sharp cheddar between the potato rows as you stack. The bacon fat renders into the potatoes and the cheddar crisps at the edges. This is the version that disappears first at a potluck.
Spicy Chili Crisp: Stir 2 tablespoons of chili crisp into the melted butter and finish the baked stack with a drizzle of hot honey. The chili crisp brings heat and crunch, and the honey balances it the way it does on fried chicken. This is the Gen Z Thanksgiving version.
Herb Butter and Lemon: Replace the smoked paprika with 2 tablespoons of chopped mixed herbs, parsley, dill, and chives, and add 1 teaspoon of lemon zest to the butter. The lemon brightens the richness and makes this the best version to serve alongside a heavy main like ham or turkey.
Storage and Reheating
Let leftovers cool completely, then store slices in an airtight container in the fridge for up to 4 days. Reheat in a 400°F oven on a sheet pan for 10 to 12 minutes until the edges crisp again; the microwave will revive the flavor but the crunch is gone for good. You can also assemble the stack a day ahead, cover it tightly, and refrigerate it raw, then bake it straight from the fridge, adding 10 minutes to the covered bake time.
Frequently Asked Questions
Can I make this without a mandoline? Yes, but it takes longer and the slices will be less even. Use your sharpest knife and aim for 1/8 inch. A food processor with a slicing disc also works well and is faster than a knife.
Why did my potatoes fall apart when I sliced the loaf? The stack was either underbaked or cut too soon. Make sure a knife slides into the center easily before you pull it from the oven, and give it the full 10-minute rest so the starches set.
What pan can I use if I do not have a loaf pan? A small square baking dish works if you pack the slices tightly in rows. A muffin tin also works for individual stacks: fill each cup with a small upright stack and bake for 30 minutes covered and 15 uncovered.
Can I prep these the morning of Thanksgiving? Absolutely. Slice, butter, and stack the potatoes, cover the pan tightly, and refrigerate. Bake them while the turkey rests, since the oven will already be hot and the timing lines up perfectly.
Why are the top edges burning before the center is done? Your oven runs hot, or the foil was not tight during the covered phase. Tent the stack loosely with foil during the last 10 minutes of the uncovered bake and check the center with a knife before pulling it.
Nutrition Estimate
One serving, about one-eighth of the loaf, contains roughly 260 calories, 5 grams of protein, 32 grams of carbohydrates, 13 grams of fat, and 420 milligrams of sodium. This is an estimate only, and actual values vary with the amount of butter and cheese used.
The Bottom Line
Crispy layered potatoes are the rare viral recipe that actually deserves the hype: three pounds of potatoes, a stick of butter, and a hot oven turn into a side dish that looks like fine dining and tastes like the best hash browns you have ever had. Slice thin, stack tight, bake covered then hot, and let it rest before you cut. The tower will hold, the edges will crackle, and the plate will come back empty.